
Installation of CD`s, CD-R`s, and any extra hard drives is fairly straight forward. Just slide them into the drive bay and secure with the screws provided. (Loose hard drives can only be secured at one side!). Fitting the floppy drives can be a little more tricky! Floppy drives should be fitted FIRST! Some towers are designed and geared up for only one floppy drive (Drive A:)and although more modern towers are designed to take two floppys, PC floppy drives are slightly thinner than the drives from your A2000.These towers also have a seperate bay to take the floppy drives and possibly one harddrive.
This entails a bit of chopping and redesigning to allow your floppys to fit snugly. the cleanest way to cut the plastic is to score with a Stanley knife and keep scoring until it is severed completely.
BE CAREFUL! BE ACCURATE! AND KEEP YOUR BLOODY FINGERS OUT OF THE WAY!
You will of course be able to fit your floppys in the bottom of the drive bays section in the opposite corner to the one which we removed to facillitate the motherboard.
Refit all ribbon cables and power cables as you go along. TIP: If you have two or three drives (SCSI) and need to buy a new ribbon cable with more connectors on then buy one about 600mm long with seven connectors on it. You will thank me in the end!
Once you have fitted all your drives where you would like them then disconnect and remove them for the time being. REMEMBER where everything goes!
Making the leads (Click!)
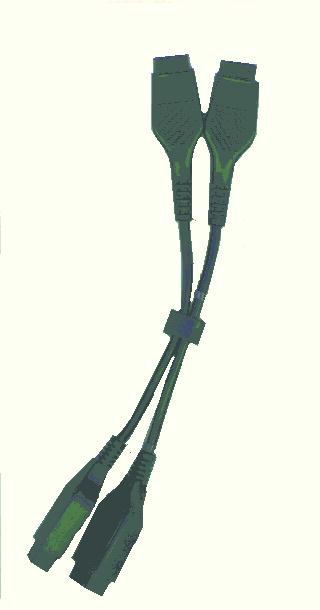
This is the tricky bit! You will need to buy four(4) female 9 pin `D` plugs (or chop the plugs off four old joysticks or busted mice (favourite!) leaving about 350mm of cable on them.) Right angle plugs are best because they fit easier in the cramped space between the back of the front of the tower and the front of the Amiga proper! You will need to carfully cut off some of the rubber moulding on a sraight plug. Next you will need to buy two(2) male to male 9 pin ~D~type gender changers and fit them into the FRONT plastic casing of the tower, cutting holes to accommodate them in a place where you have the most space directly behind the sockets. (Remember the keyboard socket also needs to go in this space!)
The 9 pin plugs need to be connected in pairs (one for the mouse and one for the joystick!) from pin to pin. The easiest way to do this is with a multi-meter but if you are not conversant with one of these or haven`t got one then you can actually do it with a couple of sewing needles, some wire, a torch battery and a torch light bulb. If you don`t understand the principle of this, then get someone to make these cables up for you! The length of these cables (plug to plug) should be as short as is necessary to reach from Amiga port to new port on the tower front and long enough to facillitate the connection/disconection and removal/refitting of the tower front!
The same principles apply to the keyboard port, except that you will only need to buy a chassis mount 6 pin DIN socket, 350mm of 6 core shielded cable, and a 6 pin DIN plug. Drill a 5/8ths hole in the tower front next to your mouse port and fit the chassis mount 6 pin DIN socket. Using the colours of the cable solder the wires from pin to pin. TAKE CARE NOT TO CROSS OVER ON ANY PIN! Remember this is only an extension of your Amiga port!
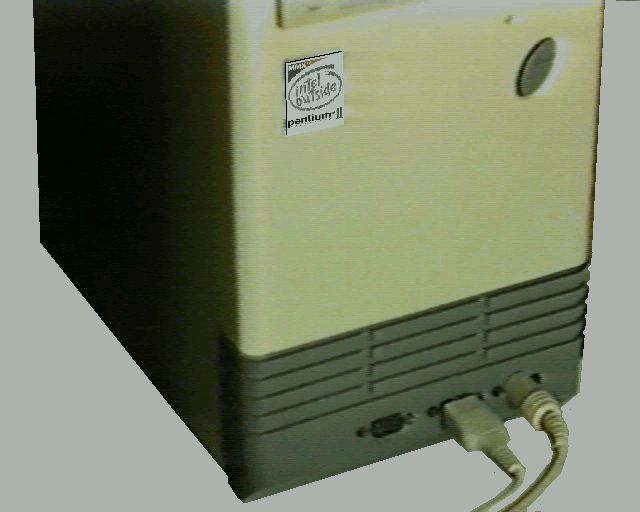 The ports in the front panel(Click!) |
Offering the tower front up to the tower frame, plug your 9 pin `D` leads in between the Amiga mouse/joystick ports and the gender changers fixed in the tower front. Plug the 6 pin DIN plug into the Amiga keyboard port and refit tower front. Refit all your drives. TEST!TEST!TEST! before replacing main tower cover! Try fitting the LED`s in the tower front to the motherboard/SCSI controller card etc. Some work, some don`t! (Don`t do this while your computer is switched ON!)
Put the main tower cover on and secure with the screws provided!
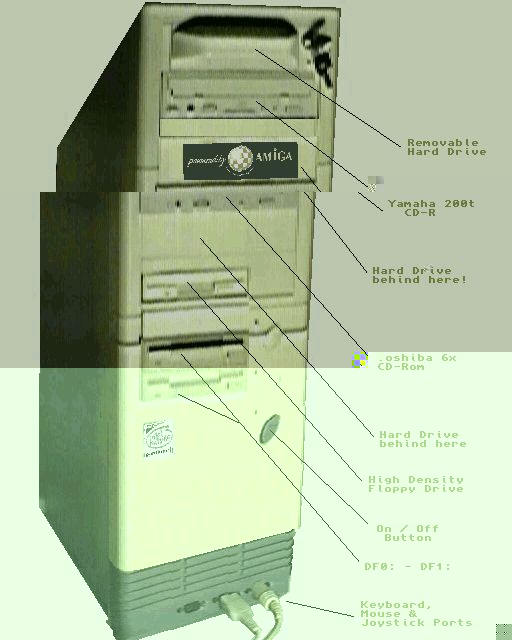
The Tower in all it`s GLORY! (Click!)
| Index |  |
| SulliTech | |